Wednesday 21 October 2009

The Business

Here is my "8 Shot Journey".

For the project, me and James worked together, he was the actor while I was was the camera man. Before we could start filming, I had to stripe my tape which is the process of recording a blank screen so to make sure that no previous filming. My film started with James waking up in the class room, with the camera in a midshot. As he wakes up, he looks at his watch. The 2nd shot is a extreme close up of his eyes in which they turn from sleepy to suprised. 3rd shot is of James walking out of the room in a mid shot, obviously dropping his ID card, which is a major feature of the film. 4th shot is of James walking down the corridor, passing someone as he goes off camera in a longshot. 5th shot is of James running through the atrium in an extremely high vantage, high angle shot. 6th shot is a mid shot of where James runs to the lifts just as the doors close. 7th shot is a long shot of James finding that the door he's run to is locked and that he's lost his ID Card. 8th and final shot is close up of the Card scanner.

This final shot brings the plot full circle, establishing that he's forgotten his ID card and his Journey has been for nothing. Throughout filming we had to do many takes on the more public shots, due to people disrupting the filming by standing infront of the camera and so on. We got past this by managing to find some secluded locations which may not of made sense to someone familiar with the building. To quote John Dempsy "The camera is an idiot magnet..." which I would definately agree with.

After finally completing filming I went into editing in which by using my log sheet, I cut apart the film, editted out the parts of the film which were not needed and put in some extra effects and title sequences in Final Cut Pro. The program was reletively easy to use once we'd been shown what to do. I have used Windows Movie Maker before which is sort of similar.

Personally I think that the whole project went well and I was pleased with the outcome. In the future I would probably need to find a way to get rid of the disruptive people who tend to ruin the filming. Overall, that was the only thing I hated about the experiance.
Overview of the Project and Video Production

The main objective of the 8 Shot Journey Project was to make a film in which someone traveled from one place to another in only 8 shots from a static video camera. The camera could not be panned, zoomed or have any movement of its own as the project was mainly to establish that we were able to frame shots and use different techniques such as "Rule of 3rds" and the "180° line rule".

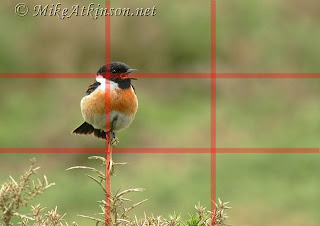
The Rule of 3rds dictates that things off center look more interesting to things in the center of a shot. In the picture you can see an example of how it should be used. Top horizontal line= eyeline, bottom horizontal line= horizon line, either vertical line=where the subject should be, where the lines intersect= where the subject should be.


The use of camera angles is also very important. Below are the different types of angles you can use.

High Angle - Makes the Subject seem Inferior.
Low Angle - Makes the Subject seem Superior.
Canted Angle/Dutch Tilt - Makes the frame/shot seem awkward and mysterious.

Along with the angle, hight is also an important factor. Eye level is natural, ground level is more interesting while a high shot gives a more commanding pressence.

Video Production Plans

Below are the storyboards and log sheets for my 8 Shot Journey.


Tuesday 20 October 2009

Jingle Evaluation

Due to this being the first time I used this software, Adobe Soundbooth, I was slow to start as I was attempting to get the hang of the software. The brief described that we had to produce 3 Jingles, one for introducing the News, a show on the radio station (SNC) and an Ident used to advertise the station during a break. However, after I had had a little time to get used to the software I was able to quickly establish what I wanted to do in terms of the Jingles. After going away to think about it for a day we came back to work with the software. However, even though we had time to get used to it, there were still a few problems with the software.

For example, a lot of people experienced problems with not only the software but the Macs themselves, such as the Macs restarting themselves and/or closing the programs for no reason. This was quite annoying and inhibited our ability to produce the work quickly and effectively. However, even though there were problems, progress was made and many of use were able to produce all 3 pieces of work well before the day was over.

I believe that if we had had more time and had gotten to grips with the program move, as some of us were more advanced than others, we would have been able to produce a higher quality piece of work. The hardest part was recording our voices, as there was a lot of background noise from the other students. If we had had portable voice recorders which worked with the Macs we would have been able to avoid the background noise or reduce it at the very least. I found that finding music and sound effects that worked with the voice was hard, mainly because we had to use existing music rather than make our own, which is the norm in regular radio stations.

Most of use used www.Youtube.com to find the music we wanted to use in the Jingles. Once we had found the music we then used another website called www.video2mp3.com where we were able to convert the Youtube videos to mp3 format for use in the Jingles. Personally I thought that the Ident was the easiest of the 3 Jingles to do, as it was not only the shortest but it also required the use of music was board, since we could use any song we wanted, compared to the News Jingle which required a more specialised tune to accompany the voice over.

My Jingles comprised of the use of classic hard Rock, mainly ‘Crazy Train’ by Ozzy Osbourne and ‘Won’t get fooled again’ by The Who. I decided on the genre of music early on so I could base the Jingles around that. The News Jingle was made up of clips taken from an old 1970’s radio station’s Jingle, accompanied by my voice over. The clips had a ‘sing song’ sound to them which I though worked well.

All in all, I enjoyed the exercise, but I believe that if we had more time to prepare and to get used to the software we would have been able to produce a higher quality of work, compared to the relatively short amount of time we had to produce this, as well as our brief understanding of the software which didn’t enable us to use it to its full potential.

Below are links to the Jingles themselves:

SNC Live Indent

Studio Promo

The News

Jingle Script

Here is my script for the jingles. It has changed in the real thing from the original script.

Show Promo

"You're listening to [Show Title] with Andrew Hallam, playing you the best music from 80's [Clip from 80's music] 90's [90's music clip] and today [recent music clip], Only on SNC Live."

News

"SNC! Live Action News, for the average Joe!/Student on the go."

Ident

"SNC LIVE!!!" [To the song "Won't get fooled again by The Who"]

Radio Basics


Radio Jingles are used for many different things. Here is a list of the different uses for Jingles:


Advertising - Such as for an event coming up or a show on later.
Radioshows - To tell the audience when a show is on and what happens in it.
Product Advertising - Obviously to advertise a certain product or brand, possibly a sponsor of the show.
Station Indents - A quick audio clip shouting out what station the listener is listening to.
News - Introducing the news.

The first thing a stations does when deciding on a radio jingle is to decide on the target audience and work from there. Different audiences have different listening needs. Once this has been established the style can easily be identified and put together using the simple Codes and Conventions as well as looking at the initial things which should always be included in a jingle.

The codes and conventions are listed below:

Speech
Sound effects
Music
Reletive Info
Appropriate for Audience
Recogniseable
Must Identify Station
Name of Presenter and Show
Time and Length of Show
Hightlights

This list must be consulted and followed when making certain Jingles.

Thursday 15 October 2009

Pinhole Cameras

A pinhole camera is a very simple camera with no lens and a single very small aperture. Simply explained, it is a light-proof box with a small hole in one side. Light from a scene passes through this single point and projects an inverted image on the opposite side of the box. Cameras using small apertures and the human eye in bright light both act like a pinhole camera.

In the week, we made our own pinhole camera's in which we use various different bases for our camera such as pingle tubes and shoe boxes to create a light tight box for our image to be projected into. By useing a small sheet of foil with a pin prick in it we were able to project an image onto some photographic paper. Afterwards we developed the paper to create the negative images.

Each image, both outside and inside, included us making subtle changes to the exposure time to get the image just right.

Here are a few examples below...


This is supposed to be a picture of an Orengina Can and a Costa Coffee cup on a bench outside the college. It didn't turn out too bad but I think it could of done with just a bit less exposure.


This was of a tree outside. The exposure was a bit off buy you can still make out one of the larger trees in the middleground. Again, the exposure time is what made the quality of this photo lower than it could of been.


This picture of the atrium was exposed for 40 minuites. The long exposure time seems to of captured the rays of dust reflecting light over a long period of time which has created a ghostly effect.


This image turned out too light initially due to being under exposed. After being inverted you can barely see the outline of the trees, swings and fence.
This is the original of the Atrium picture before it was inverted. In this view you can see the light spots eluminated in black as well as some ghostly figures on the opposite balcony highlighted in black.

The basics of a Camera


Pinhole Cameras are possibly the most basic kind of camera, using no motorised or electronic parts. Here are the basics of what is used to make pictures with a camera.


  • Basic description

A Camera is a device that records images, either still or moving images known as videos or movies. The term comes from the camera obscura (Latin for ‘dark chamber’) an early mechanism of projecting images where an entire room functioned as a real-time imaging system; the modern camera evolved from the camera obscura.

  • Shutter

In photography, a shutter is a device that allows light to pass for a determined period of time, for the purpose of exposing photographic film or a light-sensitive electronic sensor to light to capture a permanent image of a scene.

  • Aperture

In optics, an aperture is a hole or an opening through which light travels. In photography this can be measured in increments called f-stops.

  • Lens

The Lens of a camera captures the light from the subject and brings it to focus on the film.

  • Exposure control

The size of the aperture and the brightness of the scene controls the amount of the light that enters the camera during a period of time, and the shutter controls the length of time that the light hits the recording surface. Equivalent exposures can be made with a larger aperture and faster shutter speed or a corresponding smaller aperture and with the shutter speed slowed down.

Below are some examples of pictures taken with a pinhole camera...

Genres of Photography and descriptions of them...

Aerial – The process of taking pictures from the air, usually a bird’s eye view. Examples of this genre were rare and expensive till the appearance of Google Earth in which the entire Earth has been mapped out using bird’s eye view shots.

Black and White – Simply, black and white images are produced either by using specialised photographic paper, or by desaturating a coloured image in an image editing software.

Commercial – Commercial photography includes the use of images in advertising and other commercial use. These are usually pictures of the product or company name that the user is attempting to promote or sell.

Documentary – Documentary photography is usually portrayed in a very realistic and natural way and is used to present almost anything in a factual way. Documentary photography is always non-fictional.

Fashion – This form of photography is utilised to present clothes, usually worn by models, to the general public. This can be used for advertising as well as setting a trend or displaying the latest fashion. It is usually placed in specialised magazines.

Fine Art – There isn’t really a firm definition for ‘Fine Art’. Fine Art can be anything from a portrait to a landscape. It is usually created just to fulfill the creative vision of the artist.

Forensic – Used to record a crime scene for reference later in a case and to discover evidence that may be invisible to the naked eye.

Glamour – Used in the same way as Fashion. Mainly to present clothes to a wide audience.

High Speed – Used in sport to capture a high speed moment in crystal clear focus. It can also be used to see things in slow motion such as a speeding bullet or a high speed impact.

Illustration – Used for book covers to give a potential reader a general idea of the book they are about to read.

Landscape – The technique of taking photos of a landscape. Can be used in conjunction with many other media genres.

Nature – Used to record animals and plants in their natural habitat. Can be used with documentary genre.

Paparazzi – A form of photography which focuses on recording the actions of celebrities and other people.

Photojournalism – Used to record an event to be used in a media publication, either on a news program on TV, Internet or in a newspaper/magazine.

Portrait – Used commercially to capture a picture of a person/people in general or at an event that they wish to record.

Still Life – Mainly the process of taking pictures of stationary objects such as plants on a table or fruit in a bowl.

Stock – Used in the media when either the time or the money is not avalible to hire a photographer. It comprises of pictures which can be bought at a lower price than the hire of a photographer and used by the company in a media product.

Underwater – Self explanatory. The process of taking pictures of underwater objects, plants or creatures.

Wedding – The process of recording a wedding. Usually used in conjunction with Paparazzi if it is a celebrity wedding. Mainly for personal use.

Basics of Photography

Photography is the process, activity and art of creating still or moving pictures by recording radiation on a sensitive medium, such as photographic film or an electronic sensor. Light patterns reflected or emitted from objects activate a sensitive chemical or electronic sensor during a timed exposure, usually through a photographic lens in a device known as a camera that also stores the resulting information chemically or electronically. Photography has many uses for business, science, art and pleasure.

Why Hello thar!

You've stumbled across the amazing blog of Andrew Hallam. Welcome! This blog is basically a place for me to post all my media stuff.

NO COPYING.